Shooting Form: The Anchor
Posted 2012-02-27T07:24:00Z by
Shooting Form: The Anchor
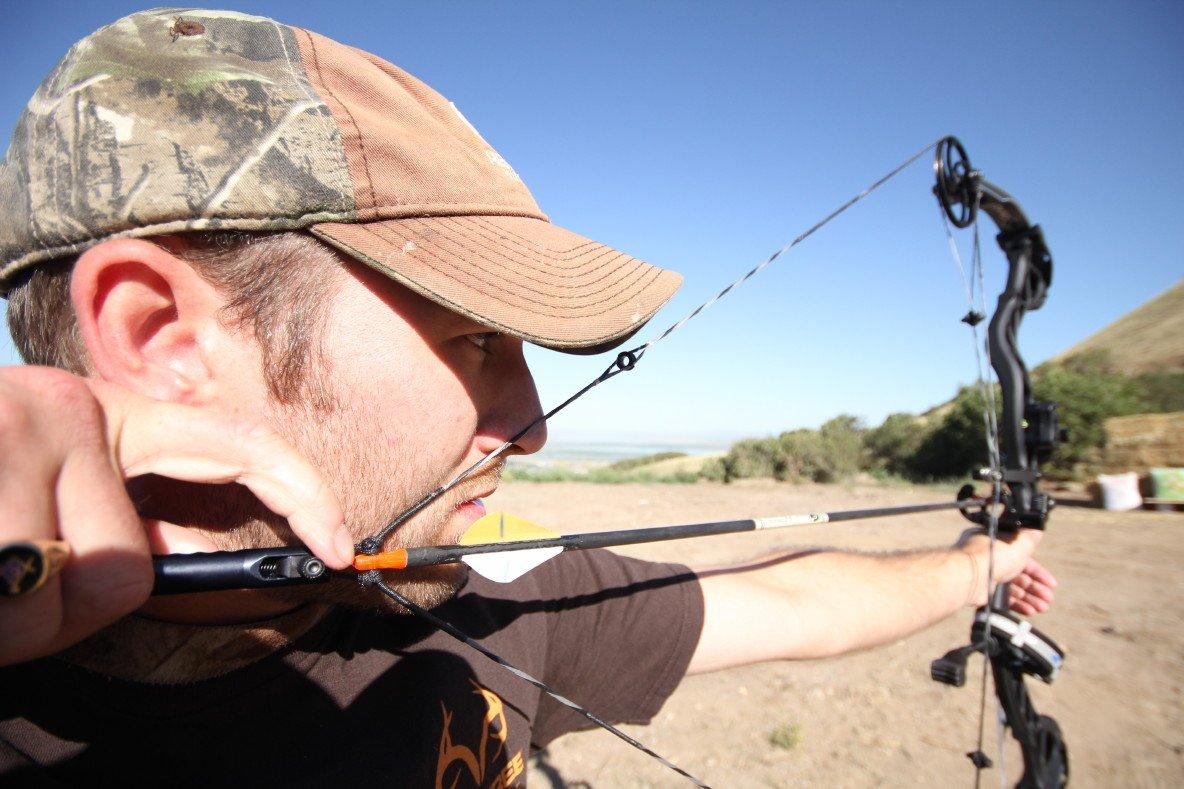
The anchor point must be rock solid, naturally comfortable and absolutely repeatable. It's normally grounded on bone, something that doesn't change with time. This typically varies depending on release style. For example, when shooting fingers, I pull my index finger into the corner of my mouth, pressing between upper and lower molars, placing my thumb under the jawbone. When anchoring with a release, I burrow my index-finger knuckle into the hollow behind my ear, with my thumb hooked behind my jawbone. You'll notice both include dual reference points, making them nearly foolproof.
There are no rules, except that your anchor point needs to include a high degree of repeatability. Find one that feels natural and comfortable to you. After it's established, stick to it religiously.
When at full draw, your drawing and bow arms and shoulders should create a perfect T in relation to your torso - drawing-arm elbow straight back (not cocked in or out, indicating ill-fitted equipment). This is vitally important, creating the basis for all shots to come, especially when shooting somewhere other than flat ground, standing flat-footed. Your hips become the gyroscope this T-form rides on. Forced to shoot steeply downhill, say from a treestand, you should create your perfect T-form and bend at the waist to address the target. Forced to shoot at a deer approaching from directly behind, you should first create your T-form, before swiveling around on your hips to make the shot. In the beginning, this is how you must approach each problem, setting up as if on flat ground, shoulders 90 degrees to the target (even if imaginary until the real target is addressed), settling into solid T-form, and only then swiveling on your hips to attend to targets as necessary. In time this will become second nature, allowing you to point directly at the target and draw less conspicuously. In bowhunting, the goal is always to minimize movement during the draw cycle. If you can't place your pin on target and pull straight back, smoothly and slowly, you're shooting too much draw weight.
While at full draw, settling in for the shot, remember to employ your stronger back muscles, and not your arms. Your back muscles are considerably stronger than your arms alone. To gain a better feel, consciously pull your shoulder blades together while at full draw, allowing the release to happen on its own accord.
Stay tuned; the release is the subject for next time.


