5 DIY Turkey Taxidermy Projects
Posted 2018-05-03T04:49:00Z by
Display Your Trophy Parts without Spending a Fortune
Turkey taxidermy is expensive. And it doesn't take many full-body turkey mounts to fill a room. Yet, so many gobblers are worth remembering beyond a beard lost in the garage. Here are five cool DIY turkey taxidermy projects that are easy to make . . . and even easier on the wallet.
Simple Tail Fan Display
Turkey Parts: Tail fan
Tools/Supplies: Knife, 3x3 sheet of plywood, thumbtacks, weights and Borax

Remove the turkey's tail by slicing around the ball-and-socket joint at the base and twisting it free. Keep all the tail feathers intact and attached to the meaty base. Carefully trim remaining flesh and liberally apply Borax. Lay the tail fan flat against the plywood and spread the tail feathers into a drying position. Place books or other heavy, flat weights over the fan to hold it in place, and use thumbtacks to pin the feathers down.
Put the tail fan somewhere safe, away from family pets, basement mice and garage bugs. Check it frequently. When the tail stiffens, trim even more skin and flesh, but keep the feathers held tightly in place. Once it's completely dry (usually after three weeks to a month), use a piece of thin leather or cloth to cover the tail base. Thin wood works for this, too, and you can paint it. Hang your fan with a wire or nail, or add to the effect by mounting it on a plaque and displaying it with the bird's beard.
Shadow Box
Turkey Parts: Several tail feathers, spurs, beard and the turkey tag if available
Tools/Supplies: Knife, small hand saw, Borax, back fasteners or tacks, wire and shadow box
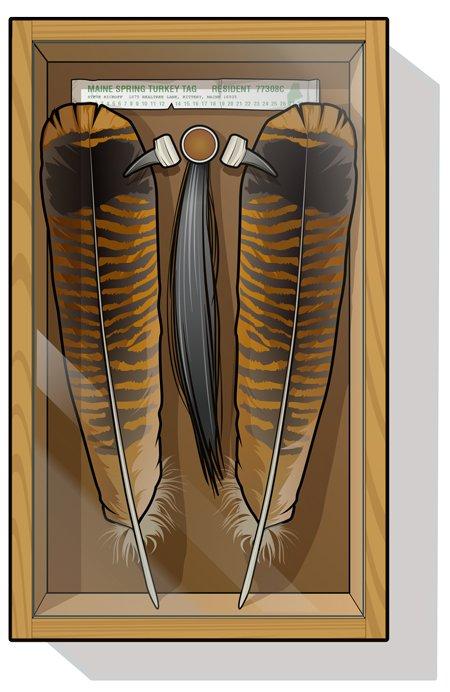
Remove the turkey beard, keeping a small bit of meat intact at the base. Take several tail feathers from the bird, sized to fit in the shadow box (you may have to evenly clip the quill ends). To mount the spurs, remove the turkey legs at the joint beneath the feathering. Cut through the leg on either side of the spur to remove it, either with a saw or heavy-duty shears. Clean the insides out with a pipe cleaner. Remove the leg scales above the spur if you wish, and finely trim them with a knife. Use Borax to aid the drying process.
Once the turkey parts are dry, arrange them inside the display with the beard and spurs hanging down in the middle of the glass-fronted mount, using thin wire to hold everything in place. Hardware and craft stores often sell small, pre-cut circles you can use with fabric or wood called sticky back fasteners (Velcro brand is a good choice). Mount the tag above your feathers, beard and spur arrangement.
Easy Beard Display
Turkey Parts: Beards
Tools/Supplies: Knife, wood plaque, small nails or tacks and Borax

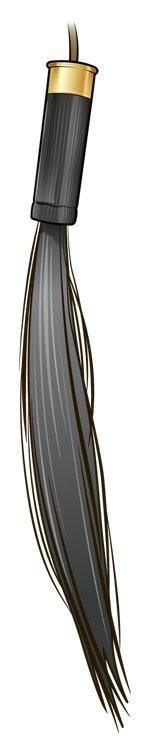 Single Beard Mount
Glue a beard inside your spent shotgun hull, along with a note about the hunt. Hang it anywhere.
Remove turkey beards by cutting them free and keeping a small bit of skin intact near the base. Some hunters jerk the beard straight off the bird, but you get one chance at doing that right. The risk of pulling it apart is high. So spend the extra 6 seconds and use a knife.
Affix beards behind or in front of your wood plaque using small nails, tacks or other hanging options. Hang the plaque with a wire and nail. This is a good mount if you've hunted numerous states and want to have beards displayed from a particular season, or if you've killed a gobbler with multiple beards.
Turkey Cape
Turkey Parts: One dead gobbler
Tools/Supplies: Knife, pins or thumbtacks and Borax

Hang your turkey by the head. Begin cutting where the neck feathers meet the head skin. Gently skin away toward the direction of the tail fan, retaining as much of the skin with attached feathers as possible. You'll need to skin alongside the bird's flanks the farther down the back you go. Take your time, as turkey skin is thin. When you're done, gently remove the remaining flesh with your knife. Use Borax as a drying agent, covering the damp skin side. Lay the cape on a big piece of wood, pinning or tacking it into the desired drying position. Be sure to spread the tail fan the way you would with a standard fan mount, detailed above. Allow the cape to dry a month or more, and check it frequently. Remove pins or tacks, clean off the Borax and you're ready to display the turkey cape on your camp wall.
Leg and Spur Display
Turkey Parts: Turkey legs with spurs intact
Tools/Supplies: Small hand saw, knife, Borax, weights, string, small nails and/or tacks

Cut the lower turkey leg off at the joint, and dip the cut end in Borax. Affix the legs and feet in your preferred drying position. A heavy book can be placed where the turkey's toes extend from the leg base to weigh it down. Secure the legs for drying in the desired position using small nails, tacks and string. You can also dry the legs flush to a wall surface in a standing position, with the spurs and feet angled just a bit. Check frequently. Dried feet with the spurs can be mounted on a simple board for display. You can also use clear, non-glossy shellac on the legs if you want to pretty them up.
Turkey legs can be dried for a variety of displays. My late taxidermist father - his creative efforts sometimes included a sense of humor - used to mount dried turkey feet with the middle toe extended and the two others folded. He then affixed each turkey leg base with a screw fastened from behind a small piece of varnished wood and hung for display. When you walk into a camp or bar and see a turkey foot shooting you "the bird," you know you're among friends.
Go here for more Realtree turkey hunting and to follow us on Facebook.
(Editor's note: This feature was first published May 7, 2014.)


